1. Introduction to Your Back office dashboard
Here we will go though a detailed introduction of your CreditSnap back office dashboard.
To get started with accessing the CreditSnap back office application, you will need:
The CreditSnap Back Office URL assigned to your institution.
It usually will be something like ABC.creditsnap.com, where ABC would be your institution. Please contact your CreditSnap account manager if you do not have your URL yet.
Back Office Login Credentials
You must have the email password login credential. If not, you can reach out to your lending team lead.
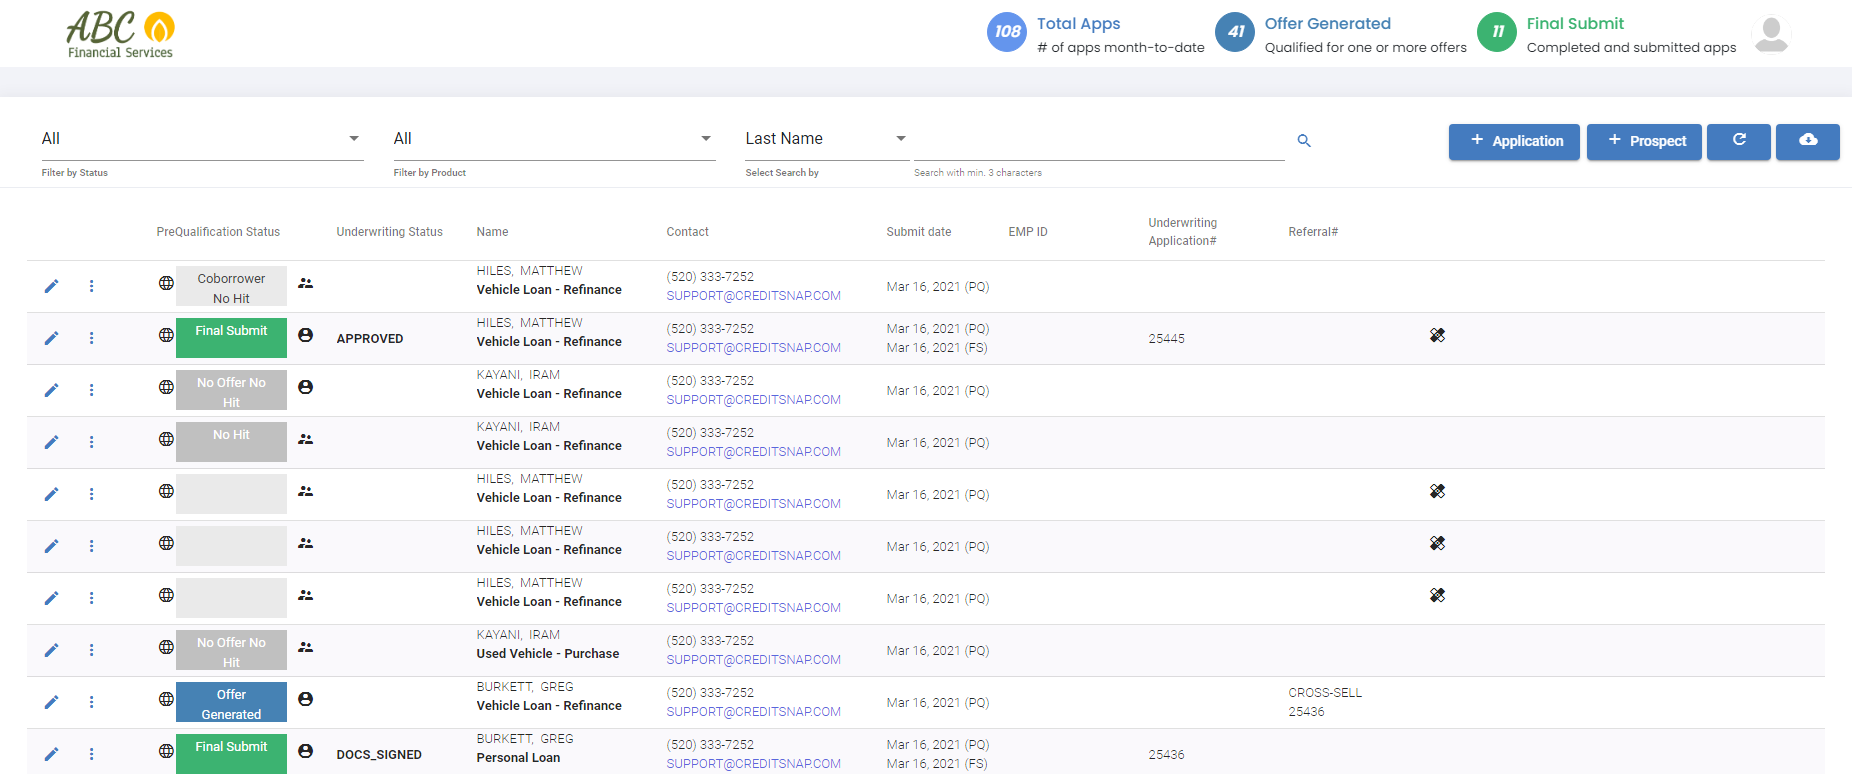
Once you Login you will see your Back-Office Dashboard. (Image Below)
The CreditSnap Back Office URL assigned to your institution.
It usually will be something like ABC.creditsnap.com, where ABC would be your institution. Please contact your CreditSnap account manager if you do not have your URL yet.
Back Office Login Credentials
You must have the email password login credential. If not, you can reach out to your lending team lead.
Once you Login you will see your Back-Office Dashboard. (Image Below)
In this section we will focus on three Areas:
1) What are the color codes you see on Pre-Qualification Status
2) What the different icons on the dashboard do
3) How to navigate using search and filter
The dashboard allows you to examine different applications in different stages by color coding:
- Orange are incomplete applications. This is an indication to follow up to get the application to Blue or Green
- Green are applications that have been submitted. It is ready for underwriters
- Blue are applications that have generated an offer. But, the customer has paused on choosing an offer. Would recommend to follow-up and convert them to Green
- Gray color records here are what we call no offers
The color coding helps you figure out who you want to target in your outbound communication.
In addition to making it easy to color coding, there's a number of productivity tools on this dashboard.
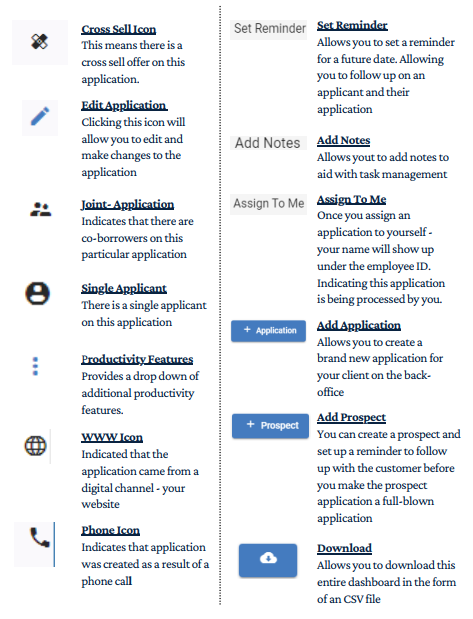
The table below will act as a key to the icons on the dashboard.
1) What are the color codes you see on Pre-Qualification Status
2) What the different icons on the dashboard do
3) How to navigate using search and filter
The dashboard allows you to examine different applications in different stages by color coding:
- Orange are incomplete applications. This is an indication to follow up to get the application to Blue or Green
- Green are applications that have been submitted. It is ready for underwriters
- Blue are applications that have generated an offer. But, the customer has paused on choosing an offer. Would recommend to follow-up and convert them to Green
- Gray color records here are what we call no offers
The color coding helps you figure out who you want to target in your outbound communication.
In addition to making it easy to color coding, there's a number of productivity tools on this dashboard.
The table below will act as a key to the icons on the dashboard.
Finally, let us come to navigation using search and filter at the top of your dashboard. You can filter through the applications on your dashboard by Status and Product. For example: If you wanted to see only applications that are incomplete for vehicle loan refinance - you would select Incomplete and on Filter by Status and Vehicle Loan - Refinance on Filter by Product to be presented with a filtered list.
Similarly, if you are looking for a specific application you can search for it using the Select by Search field. You can choose one of the fields in the drop down menu and enter the subsequent field information to pull that particular application.
Please review the other FAQ material OR contact your CreditSnap Account Manager if you have any further questions. For any specific technical support - Please contact your internal CreditSnap point of contact who will set up a support ticket for you with CreditSnap.
2. Loan Application Guide
This section will act as a guide to the inner workings of an individual loan application.
You can see a full loan application by clicking on the pencil icon (edit application icon). You will then be redirected to the Application Package Page (Image below).

This is where your entire application pack is available for you. It's organized as tabs in a progressive way. To elaborate the Borrower tab where the applicant data sits in the first tab, next is Trade/Collateral where you have the underlying collateral information. Once they are populated we can see the offers in the Offers tab where an offer is selected followed by the Final Consent tab to take customer consent.
Let us dive into each tab in a little more detail:
BORROWER
This tab houses all relevant applicant data. If it is an individual application, you will only see one applicant here. If there was an additional applicant, you will see two or more applicants.
You can add a co-borrower to the application by clicking on the +Borrower button.
You will also see employment history, address history, additional income, event history and consent history on the same page.
TRADE/COLLATERAL
In this section we will be dealing with Trade Line Selection and Collateral.
Trade Line Selection is the selection of a trade line from the credit report to simplify a refinance/balance transfer/debt consolidation loan process. Whereas, collateral is specifications of the underlying asset depending on what the loan application is being filed for.
Secured Loans: collateral is always required (unless borrower does not know the collateral yet) and trade selection is ONLY required if it is a refinance or debt payoff.
Unsecured loans: Collateral is not required. Trade line selection is applicable for balance transfer (credit cards) and Debt Payoffs (Personal Loan Debt Consolidation). For unsecured installment loans collateral is not required but trade is OPTIONAL if a balance transfer or credit card debt consolidation is requested.

OFFERS
Once the Borrower and Trade/Collateral data the application will generate offers based on the data. This is where the Offers tab comes into the picture. Here we are shown the Loan amount, rate and terms of the loan(s) offered .You can also make adjustments to the Desired Loan Amount, Max Monthly Payments and Interest Rate using the sliders on the top of the screen.
Once the final adjustments are made an agreed rate and term selection must be made. On making a selection you will be allowed to move into the Final Consent Tab.
FINAL CONSENT
This is where you take the application and make sure your customer understands that this is where their hard equity consent is needed. And, this submit, we'll send this application into your loan origination system.
So think about this as the last and final step of this application before going to your underwriting team. On submit this tab will also indicate any information that is missing along with where it is missing from to ensure you have a complete application being submitted for underwriting.
The Loan Progression
Below you can see the loan progression lifecycle.
Borrower → Trade/Collateral → Offers → Final Consent
Other Tabs
Outside of the Loan Progression Lifecycle There are a few other tabs that provide and store some important information. Here that we will touch up on them:
CREDIT REPORT (SOFT)
This tab will provide a full credit report for the applicant(s) on this application. Please refer to the Credit Report section for a detailed breakdown of the metrics under this tab.
BOOK OUT
The Book Out tab enables you to file away your valuation as a book out sheet.
CROSS SELL
Under this tab you could see if any cross sell offers available to the applicant. You can share those options with the applicant and see if it can lead to them being interested in another product to purchase.
DOCUMENTS
Here you will be able to store any documents that are required for the application process. You can either request applications from the applicant directly using the +Request Document option or add them yourself manually using +Add Document option
ADD ON PRODUCTS
If you have activated any ancillary products as part of the application they will show up as add-on under this tab.
Please review the other FAQ material OR contact your CreditSnap Account Manager if you have any further questions. For any specific technical support - Please contact your internal CreditSnap point of contact who will set up a support ticket for you with CreditSnap.
3. Creating a New Loan Application
In this section, we will cover how to create a new application from the back office and take it to the finish line.
Usually you would create a new application when a customer has called you over the phone looking to start a new loan application, or this could be through your branch channel where you have someone walk into your branch looking for your help with a brand new loan application.
So in both scenarios, you log into your back office application (Refer to Back Office Dashboard Intro FAQ)
To get started click on the +Application button at the top-right on the dashboard screen. On click you will be directed to a page looking for the very basic information such as - Type of loan application and an array of personal information Please note some fields are mandatory and some are optional - collecting as much information as possible from the applicant at this stage will speed up the process.
An important point to note is there are two consent requirements here:
1) The first consent is about soft inquiry and credit report consent.
2) The second consent is optional and for marketing consent.
You should read these out verbatim to the applicant and take their verbal consent. Once you have their consent - you can provide the consent on behalf of your borrower.
Soft inquiry and credit report consent and is required. You will need this to move forward with filing an application. Marketing consent is optional.
Once this form is complete and you receive the consent(s) - click Save & Continue. This creates an application and an application number as well. You must be familiar with this screen and the functionality of the tabs here (refer to the Loan Application Guide FAQ).
Please review the other FAQ material OR contact your CreditSnap Account Manager if you have any further questions.
For any specific technical support - Please contact your internal CreditSnap point of contact who will set up a support ticket for you with CreditSnap.
4. Credit Report Guide
In this section we will be taking a deep dive into the credit report tab on the CreditSnap back office application. This is where you will go if you want to understand how the credit ratios are working or examine what exactly the credit profile of this customer is.
If it is an individual application, which is a single applicant application you will just see one primary tab and the credit report for the primary here. In case there is a co-borrower, you will see a co-borrower tab right next to primary which can also be examined by clicking on it.
Let us draw our attention to the ratios presented at the top of the tab screen. Please note: These ratios are at the loan level not the primary or co-borrower level. This is because we take the trade lines from both primary and co-borrower add them up to, to arrive at the joint ratios. So that's why these ratios are at an application level and not at a primary or a co-borrower level. These ratios are structured as:
- Before Loan
The ratios here show the current obligations of the applicant(s)- not taking into account the new obligations they are willing to take on. It provides a bit of perspective before you make the new loan.
- After Loan
After loan ratios reflect the ratios after taking into account the selected loan amount from the offers tab.
Now coming to the credit profile itself, they are always specific to each applicant. So primary will have its own credit profile and so will the co-borrower.
Credit summary
This section gives us a 10,000 foot view of what this borrower's credit profile looks like.The score is a great indication of the underlying credit behavior. It could be a FICO score, a VantageScore, FICO Score 8 or whatever score your institution uses will show up here. This section also provides information on all the trades ,open trades, installment trades and revolving trades.
Collections
This section indicates upfront if there is any adverse behavior that you should know of.
Judgement
Indicates if there are any judgements on record that you should know about.
Fraud Alerts
This section will appear if there are any SSN or date of birth mismatches. If you are subscribed to any fraud warning/alerts from your bureau they will appear here. Please note that this section is only visible if there is a fraud alert on the profile of the applicant(s).
Trade Lines
The trade lines are split into Open Trades and Closed Trades.
Each loan is a trade line of its own and you can see original terms and the remaining term along with the term and rate. When you look at all this information you usually get a pretty good perspective on things like - was there a term extension, what is the remaining term, what's the remaining balance and current monthly payment this borrower is making on this particular installment loan, and then you come to payment status.
If you want to see the raw credit report itself, we give you that option. Simply click on the Full Credit Report button at the bottom of the screen.
Please review the other FAQ material OR contact your CreditSnap Account Manager if you have any further questions.
For any specific technical support - Please contact your internal CreditSnap point of contact who will set up a support ticket for you with CreditSnap.
5. Employee Admin Guide
This section is about how to give access to the CreditSnap Back office application to additional employees, underwriters, service representatives, or customer representatives.
If you are here, you are most likely the team lead and you have the privilege to, to add an employee to the back
office application.
After you login to your back office, click on the profile icon at the top right corner.
office application.
After you login to your back office, click on the profile icon at the top right corner.

If you don't see admin under your profile, that means you're not set up with admin access. If you do need to be set up with admin access please contact your CreditSnap account manager.
When you click on the Admin icon in your profile you will be directed to a page with multiple admin options. If you are an employee admin and not a product admin, you will not see lender, index rates and managed managed rates, but you will see employee. But, if you're only a product admin you will not see employee, but you will see lender and index rates. administrators, but let's focus on the employee admin. We will focus on Employee Admin in this FAQ.
To add an employee to the CreditSnap application go to the +Employee button and provide the information required. You should select at least one or multiple roles to provide the admin the subsequent privileges associated with each role.
Once you provide the required information, assign a role and click add - the app will send an email to this particular user so they can set their password and get started on using the back office app.
An employee admin can also manage access, in the case that an employee leaves your company, you need to as a requirement delete their access. To do this you click the gear icon next to the employee ID of the outgoing employee and select Delete. Please note - delete doesn't mean this record has literally vanished out of thin air because there's a lot of traceability built into the system. The deleted user will never be able to get into the system, but behind the scenes, in the database, that user exists as a no permissions user record for traceability reasons.
You can also use the gear icon to Edit a customer's profile here. For example - last name or name changes. You can also reset the password here - The email will automatically go to your employee and they can reset the password themselves.
Please review the other FAQ material OR contact your CreditSnap Account Manager if you have any further questions.
For any specific technical support - Please contact your internal CreditSnap point of contact who will set up a support ticket for you with CreditSnap.
6. Product Admin Guide
In this section we will explore the Product Admin features. As a product admin you will be able to manage different loan categories, index rates and manage your rate sheets on your admin dashboard.
Lender
Under this section you can see all your loan categories. Here you turn off or turn on a particular loan category, change the valuation type (for example - change it to retail valuation from trade in for auto loans or vice versa), yo can also adjust the minimum and maximum loan amounts for each category.
Index Rates
Here you can maintain the underlying base rates. If you are using index rates you can adjust them here and it will automatically reflect on all the credit tiers. if only prime has changed and you're not changing anything else, it's much easier for you to come here and change the index rate.
Manage Rates
This is essentially a reflection of your rate table. In your rate table you have a number of different credit segments and every credit segment has a rate associated to it. If there are more than just prime or index changes you will manage them here by clicking on the category you wish to modify. You will then see a screen that look something like this (image below):
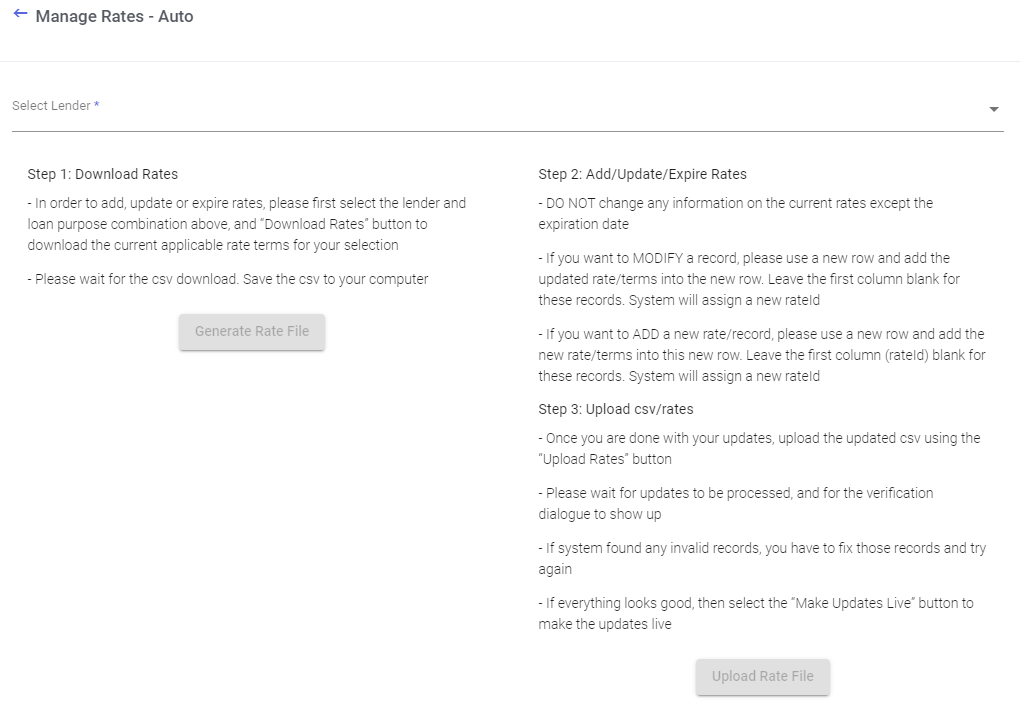
There are some instructions here as well, but really it's a, it's a pretty logical approach. First, we ask you to download rates - get a snapshot of what the current rates for this category are. So you select the loan category. Then you select which sub-category you want to change the rates for (for example - In the case of auto select between refinance or used vehicle purchase etc) front he drop down at the top of the page.
Once you select click on Generate Rate File,this will get you a CSV file. You will be able to go in and update the rates in that CSV. When you open that CSV, a couple of things to note, we always encourage you to not edit existing rates, but expire an existing rate and add a brand new role in that CSV to reflect the brand new rate. This makes sure that you leave on an audit trail. So instead of updating an existing grid and, or writing the change, you just expire the current rate and instead add a new record for the new rate.
As your goal is to change the spreadsheet in such a way that you want it to reflect the brand new rates. And once that is done, you can come back here, upload the rate file, and the system will tell you if it is seeing any anomalies or anything out of ordinary.
Once you verify you and are comfortable then go live.
To summarize, it's a three-step process. You Download → Make Changes → Upload.
Please review the other FAQ material OR contact your CreditSnap Account Manager if you have any further questions.
For any specific technical support - Please contact your internal CreditSnap point of contact who will set up a support ticket for you with CreditSnap.